Showing posts with label 3rd Grade. Show all posts

Tuesday, January 7, 2014

Favorite Projects of 2nd Quarter - Part 2: Holiday Inspired Projects

December Projects Inspired by the Holiday Season
Abstract Trees
Poinsettia Painting

Santas in Pajamas
I generally just continue with my normal lessons during the month of December, however I do love all the excitement the kids have for the holidays. So if we finish with projects the first of December, I will connect the concepts we have been learning about, or will continue to explore in the new year, with something holiday themed.

These are a few of my favorites this year:

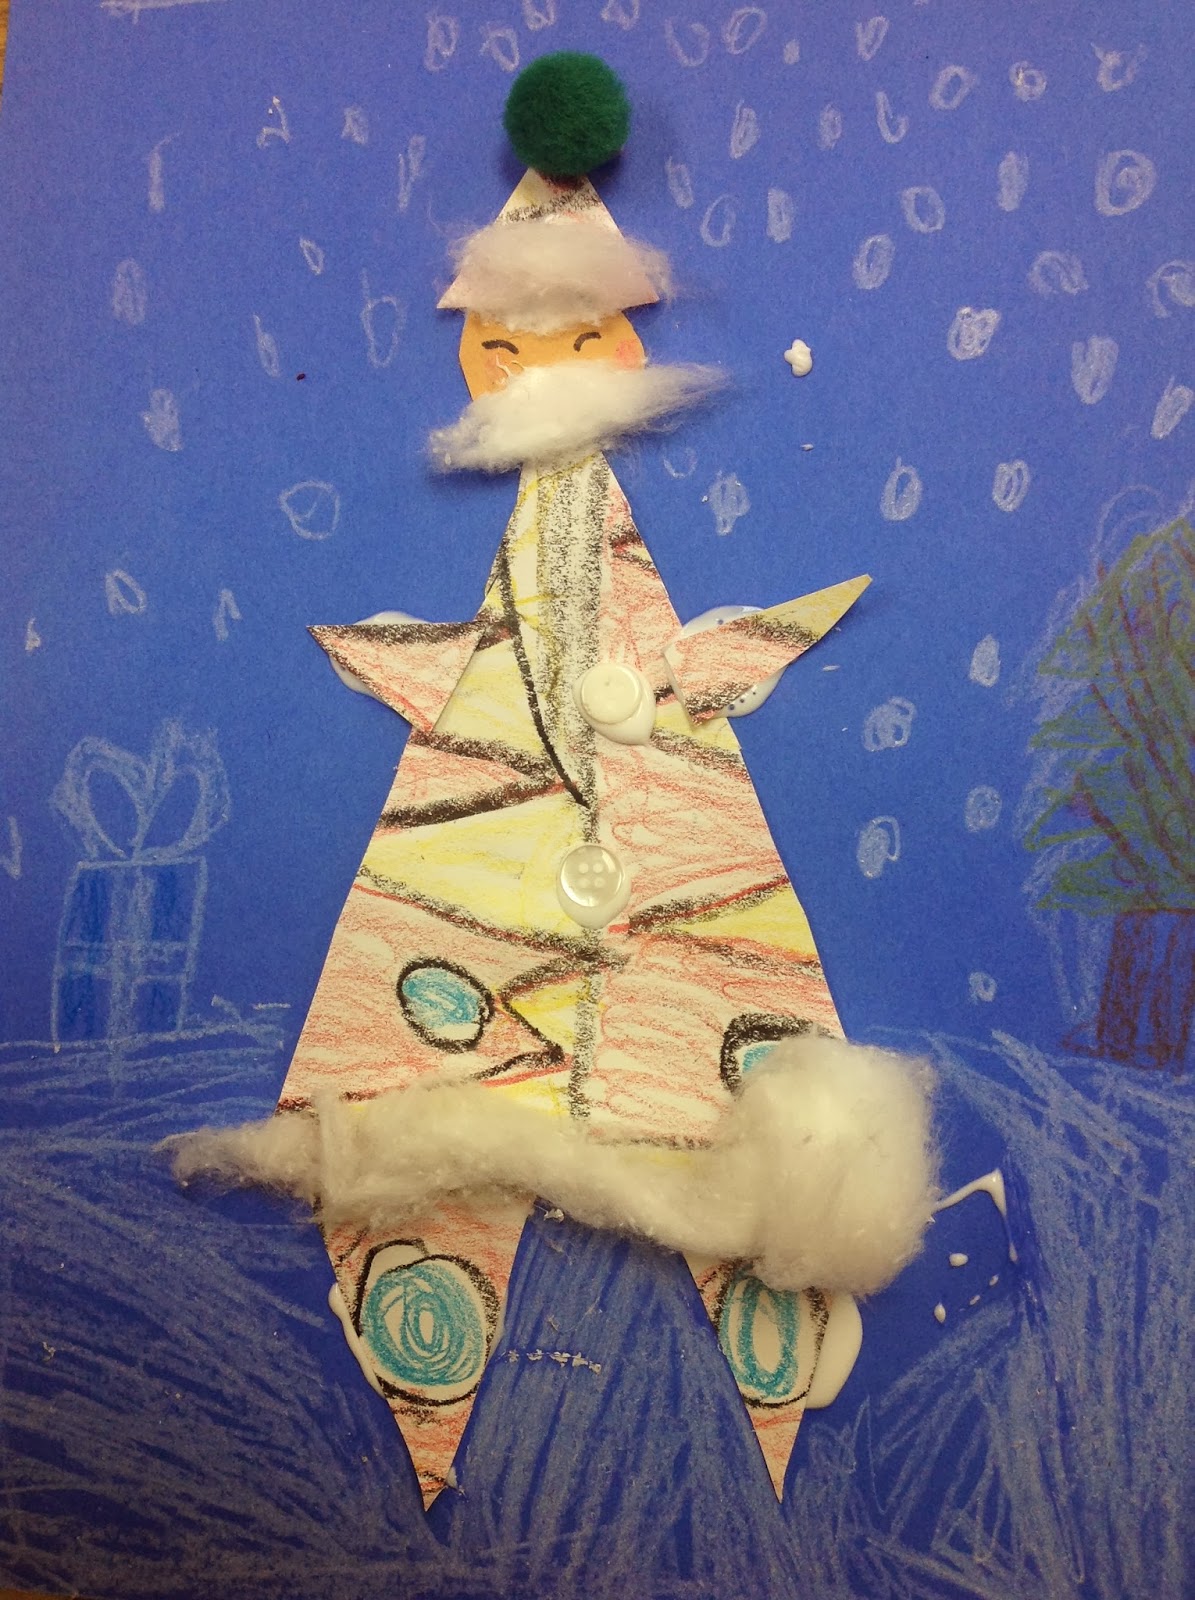
Santas in Pajamas - (1st-3rd grade ELL class)
This was actually a formative assessment. I needed to know where their knowledge was on shape and pattern so that I would know where to focus the learning after break. 
We quickly reviewed what a pattern was and students colored a paper with whatever pattern or patterns they could come up with.

They then cut the patterned paper into a large triangle and five smaller triangles to create Santa's clothes and a circle for his face. I asked these students if these shapes were geometric or organic shapes as they worked on this. Students added some facial features, cotton balls, buttons, and anything else they wanted to complete their Santas. 
They did look at me strangely when I started singing "Santas in Pajamas are dancing round the tree..." in the tune of Bananas in Pajamas.


Poinsettia Painting - (5th Grade)
5th grade students had been working on color theory. One of our objectives for this grade level is for them to understand what complementary colors are and use them in a work of art. The poinsettia sponge painting is perfect project for this. After discussing complementary colors we used sponges and red paint to create the flowers. The sponges were cut into a petal shape.
*In one of my buildings my bag of precut sponges disappeared and I was forced to sacrifice some sponge friends - :( sorry giraffe and donkey!
Students added the complement of red (green) to the background of their flowers. They could put some green in the background, paint it all, paint leaves, it was up to them as long as they showed the complementary color pair. Some details were added to the center and they were done! This is an easy and fun one day project. The results are beautiful and the students understand the contrast that complementary colors present. 


If time allows, I usually follow this art class with one where they can experiment with the other complementary color pairs. What happens when the two colors are mixed? Create a mini painting using another two complementary color pairs.
See more of these in one of our Artsonia Galleries!


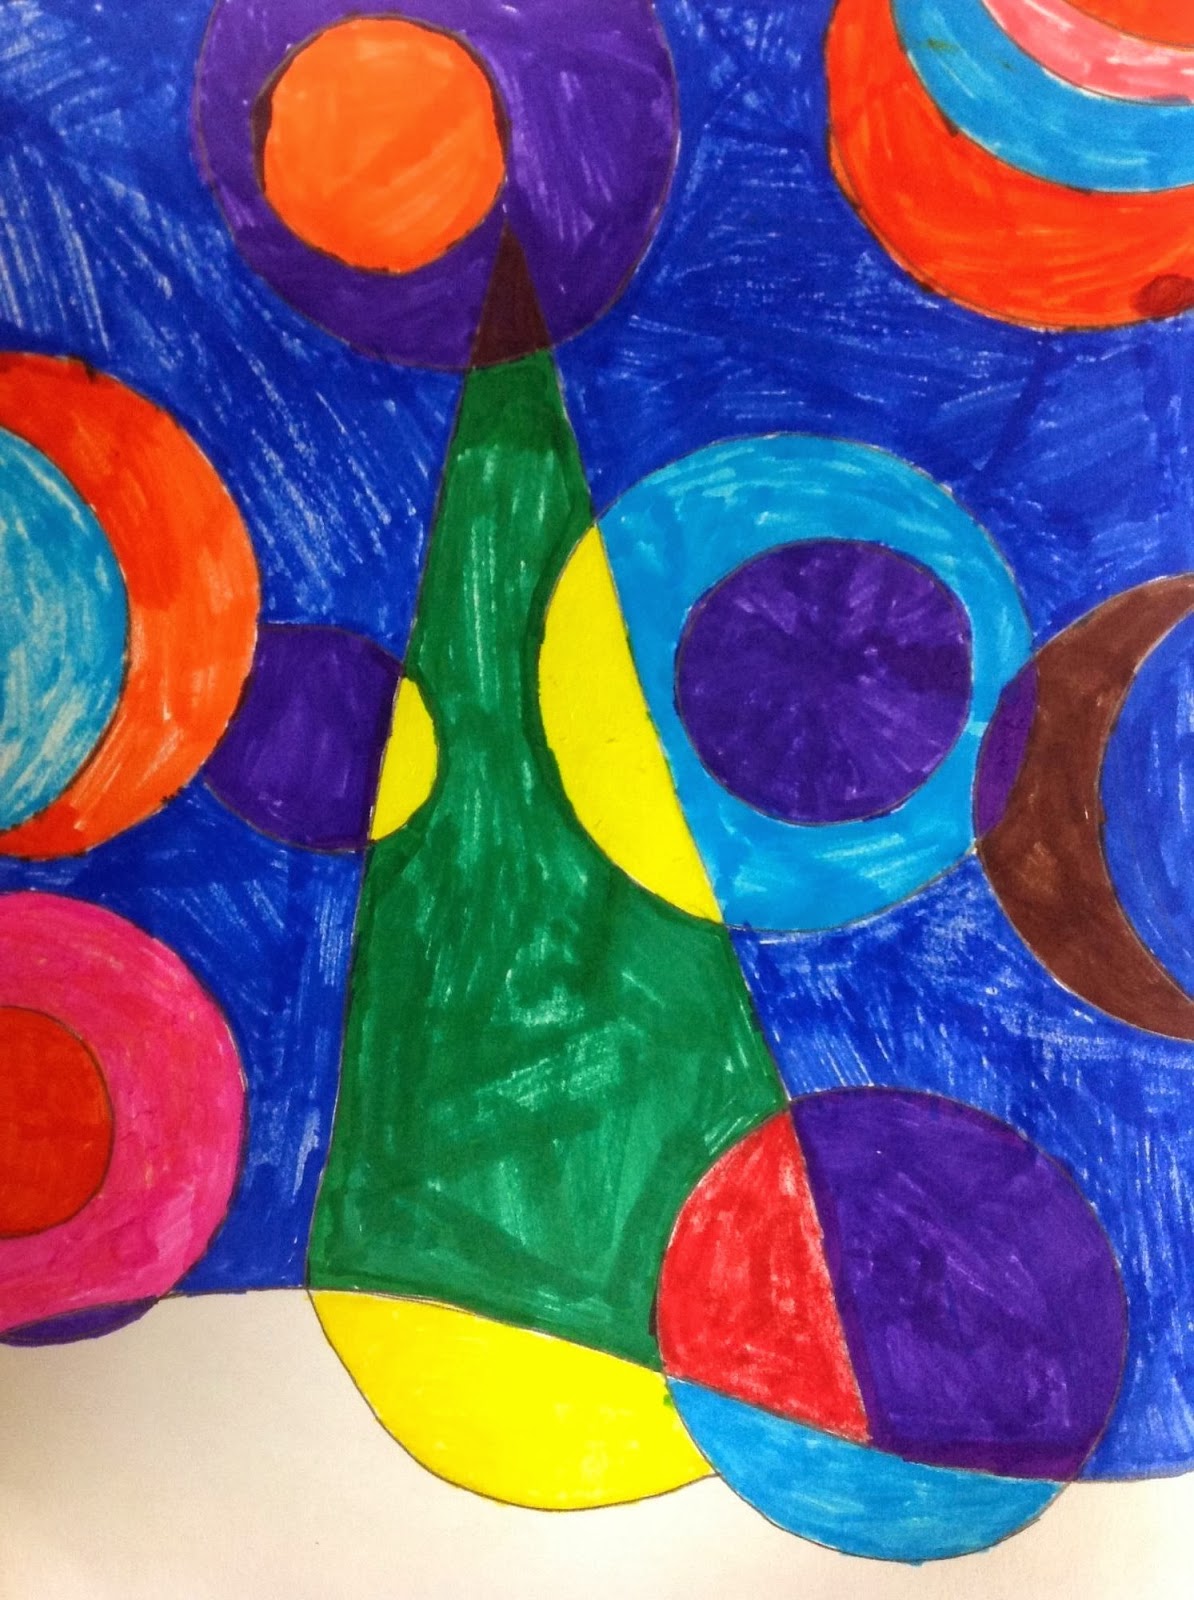
Abstract Trees with Geometric Shapes - (3rd and 4th Grade)
This project followed our color lesson so we were able to extend our color discussions to talk about contrast. We looked at the color wheel and identified colors that would stand out when put close to each other. We also discussed the difference between Abstract and Realistic Art and Geometric shape when drawing out our picture.
Students were thrilled to learn they would be using markers to color in these designs. I guess I don't use them very often in our lessons. 
These took a couple art times to finish and students really enjoyed working on them. 


 See more of our Abstract Trees in our Artsonia Gallery!


Monday, December 30, 2013

Think Dots As a Formative Assessment

Color Think Dots - used as a formative assessment for third grade

My third grade students were finishing a project at different stages. Since I have only 6 iPads for my students to use, we often work on multiple projects when it involves using them. Third grade students were typing in their Color Letters (Post to come later on this creative project!) as they finished up on the drawing part of the project. I assigned this Think Dots sheet for students to work on as they waited for their turn on one of the iPads or when they finished. This both gave them something to do that reviewed their color knowledge and showed me where we still needed to focus our learning. Since it involved painting and rolling dice - they were into it. 

Each table was given a laminated Think Dots sheet (laminating will save it for use over and over again) and a die. They were showed how to fold a 12x18 paper into 6 sections. They were to roll the die and do what was asked of them on the Think Dots sheet. They could re-roll but eventually all tasks should be completed. Generally in a Think Dots activities, there are varying levels of difficulty or thinking. The task contained lots of choices that let the students show their creativity. 
For example - "Paint a design in a section using Primary colors." This gives students the opportunity to paint anything they wish. 

When students are finished with these, I will be able to look them over and gather data on how many students completed each task correctly. That data will guide my teaching on the next lesson we do. If all students have mastered most tasks then we can move on to a new concept. I may find that many students still need some extra time learning a certain concept. 

You can find my Color Think Dots here if you wish to borrow. 


Tuesday, January 8, 2013

iPad Art - Words and Landscapes - Manipulating Traditional Art with an iPad

Have I mentioned how much I love iPads? Once or twice :)

This first semester we've been enjoying our 6 iPads in my art rooms. Students have to take turns or work in groups but they don't seem to mind. They all love working with them. We will be working on creating original works directly on the iPad soon, but for now we have been using them to transform our traditional works in a few different ways.

The first example of this is adding words to the Grant Wood inspired Landscape Collages. After students finished their collage works, they used the app WordFoto to add a set of words to their art. Students learned how to use the iPad to photograph the artwork. Then they added 5-6 words that were inspired by their artwork. The first word they were asked to add was their name.

Here's one of the traditional works -


And here's her work full of words - 

The WordFoto app is customizable so that students can pick different fonts, colors, and other options to make their work as individual as them! They had fun playing around with the settings.

When a student liked their digital work they emailed it to me so that I could add it to their Artsonia Gallery.


The best part of this project was how the students worked on it. I showed the whole class using the iPad hooked up to the projector so they could see how it was done. Then while most of the class worked on another project, 6 students came back to an area of the room to work with the iPads. I helped these students on the steps, answering their questions and showing them some options. When they were finished I showed them how to email the image to me. Then the magic began - these students were asked to go bring another classmate back to the table and they taught that student by using words or pointing (not doing it for them) how to use the app and then how to email it. So by the time everyone's work was done they had been taught how to use the app and then they taught someone else how to use it!


Grant Wood Inspired Landscape Collages


3rd Grade students created these painted paper collage works inspired by Grant Wood. 

The concept of Intermediate colors (Tertiary colors) has been one that my students sometimes have a tough time getting. I would go over the color wheel with them, but we didn't spend much time on it. This year I decided to try something a bit different with my Grant Wood landscape collage project. We spent a couple art classes making painted papers (which students love to do!). I had students pair up so that they could work together. They chose a primary and a secondary color by it to mix into an intermediate color. They mixed the color together on a paper plate and each painted a paper. They used some painting combs or craft sticks to draw some texture into the paint before putting it on the drying rack. The goal was for each pair to mix all six intermediate colors in the two painting classes.


Once we had our papers painted, the students took a look at landscape paintings by Grant Wood. We talked about his use of overlapping and shape. They chose a construction paper for the "sky" color and began to cut and put together their own landscape collage. I encouraged student to split their papers in half (the long way) and trade one of the halves with another student so they would have even more variety for their collage.

The finished projects were awesome!
Check out more of them on Artsonia - Washington Elementary and


See how we took these artworks to a new level using iPads. We added words to our images. See my post "iPad Art - Words and Landscapes"


Wednesday, October 24, 2012

Ink-Blown Trees on Warm and Cool Backgrounds

3rd Grade students reviewed Warm and Cool colors as they painted two 6x9 papers with watercolors. We discussed the wet-on-wet watercolor technique to blend colors together. Some students tried this on their background papers.

The next art day I demonstrated how to use a dropper to apply ink to the painting and a straw to blow the ink into tree-like shapes. I love the "Ooos and Ahs" that happens when you demonstrate something the students get excited about!

I set up the tables with small cups of India ink on a paper plate with the dropper. The students placed their papers onto a "placemat" (12x18 contraction paper that we reuse under paintings). When they were set up they got a straw and began to do their trees.

Students were on task and had fun watching the ink roll the direction they blew.

A couple of my classes worked extra well and were finished with their trees early. I had a plan if this happened and I was glad to be able to give it a try. When I saw students were going to finish early I stopped the group and showed how to do an ink monster. I dropped some ink on the center of a 9x12 paper and then blew the ink until it had soaked in and couldn't go anywhere else. This excited the students even more. I told them next class we would add to these ink blobs to create monsters.
Students that had a bit of problems trying to control the ink to create trees were more relaxed and were able to find success at the free-form blown ink blob.


The next art class I helped students glue their warm and cool trees onto a black paper for display. As I worked on this the classes that had time the week before to do an ink blob for a monster began to transform them using googly eyes and colored pencils. 

I honestly think the ink monsters were a huge hit and many came out even better than the trees!


 See some ink monsters here --http://www.artsonia.com/museum/gallery.asp?exhibit=562087


Friday, February 3, 2012

One Clay Project - 3 Ways! Cantrell Inspired Clay Faces

Kimmy Cantrell Inspired Clay Faces - Finished 3 Ways - Which is the best method? 


Last quarter I was lucky to have a wonderful student teacher. As part of her practice teaching she created a project unit for 3rd grade dealing with shapes and colors. One of the projects was a clay project inspired by artist Kimmy Cantrell.  She came up with a great clay face project that combined shape and texture. We brainstormed different ways of finishing the pieces - using glazes or painting with acrylic.  Because I'm in three different buildings there were 5 classes that were going to be doing this project. She would be doing the project with the 3rd graders in two of my schools and because of the timing I would be doing it with the 3rd grade class in my third school after her time with me was done. We decided to experiment with how to finish the clay faces to see which was the better method. She used glazes in one school and acrylic paint coated with wax in the other school. I decided to use acrylic paint with the class I did - but had students base coat with black first.

I think there were great successes in all of the classes. The students enjoyed the project. They learned about asymmetrical design, texture, and a new artist all while having fun!

Here are the results of the three different methods....which do you prefer?

These pieces were finished using glazes - 


These pieces were finished using "earthy" colors of acrylic paint coated 
with some floor wax for shine - 


These pieces were finished with a base coat of black acrylic - when that dried students chose lots of different colors of acrylic to it. No wax coating seemed to be needed -