Monday, January 14, 2013

Kindergarten Bird Paintings Inspired by Audubon

~ Geometric Shapes, Organic Shapes, and Drawing from Observation ~

Bluejay by Mathias

Kindergarten students learned a little about the artwork of John James Audubon with this lesson. We looked at some of his bird paintings and talked about how he observed birds in nature to see what they really looked like. 

We discussed what drawing from observation meant. Since we couldn't go outside in the cold and get a bird to sit still for us, we did our observation from photographs. I picked out a handful of birds that students would have seen in our area - Northwest Illinois - and printed out pictures for students to look at. We had just done a lesson in shape. We discussed the two kinds of shapes - geometric and organic (free-form) shapes before the students started drawing the bird they picked to do. I continued to remind students to look at the bird and see what shapes they saw and draw what they saw. One student got to giggling at me because I kept repeating "as you draw look at the picture then back to your paper...then back to the picture. Look at the picture...look at the paper...look at the picture..." He repeated "picture - paper- picture-paper" while giggling. But they got the idea and all really looked at the shapes they saw!

After drawing with pencils, I had the students go over the lines with a black Sharpie marker. The next class students painting their birds. Again they picked up the bird photos so that they could look at the colors as they painted. The birds below were painted with tempera cakes.  See more of our Kindergarten birds in our Artsonia gallery.

Mallard Duck by Alandra

Cardinal by Hailey

Robin by Olivia

Friday, January 11, 2013

iPad Art - Our Chalk Cupcakes Go Wild - Digitally!

Our chalk cupcakes got even sweeter when we had fun with iPad apps!

I photographed the students' chalk cupcakes for Artsonia, as I do with the majority of artwork created. Because I planned on having the students use these images on the iPads, I also created folders in Dropbox with each class's pics.
My 4th grade students (and a few 5th graders in my 4/5 split) learned how to find their cupcake image in Dropbox and download it to the camera roll, on the iPad they were using. I introduced two apps to the whole class using the iPad connected to the projector. I showed the students how to open the app, upload their picture from the camera roll, and how to adjust settings until they liked the creation. I then showed them how to email the finished image to me. I didn't spend a long time on this demo in front of the whole class though. Instead I spent more time with the first 6 students (I currently have 6 iPads) on teaching them more in depth. Then after they finished their digital images, those students chose another student to teach. This cycle continued until all students were finished. By learning and then teaching to another person you retain more knowledge.

One of the apps we used was the Percolator App. It has a lot of manipulations and adjustments that can really transform one artwork into another!


The other app we used was PhotoTropedelic  It's a very fun colorful app!

See more in our Artsonia Gallery 

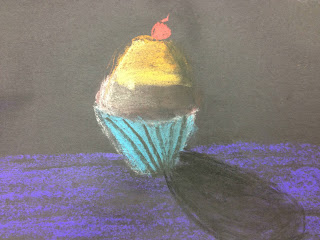
Wayne Thiebaud Inspired Chalk Cupcakes - 4th Grade

4th Grade students learned about American artist Wayne Thiebaud while creating these yummy-looking artworks.

After we spent some time learning about Thiebaud, students were able to practice using chalk pastels to make a drawing of a ball. We went through how to make an object look more 3-dimensional by using highlights and shadows. They practice blending and keeping fingerprints and smudges off their work. We also talked about being safe and smart with the dust that is created. No blowing or wiping away the dust. Instead it is tapped off into a garbage can.

The next class students worked on their cupcake. I think the practice they had really helped students feel more confident about created their cupcake.

Here's some of my favorites -


We will also be transforming our cupcakes using one of two iPad apps. *that post here*
And...our 2D cupcakes will go 3D with a clay project!

Tuesday, January 8, 2013

iPad Art - Words and Landscapes - Manipulating Traditional Art with an iPad

Have I mentioned how much I love iPads? Once or twice :)

This first semester we've been enjoying our 6 iPads in my art rooms. Students have to take turns or work in groups but they don't seem to mind. They all love working with them. We will be working on creating original works directly on the iPad soon, but for now we have been using them to transform our traditional works in a few different ways.

The first example of this is adding words to the Grant Wood inspired Landscape Collages. After students finished their collage works, they used the app WordFoto to add a set of words to their art. Students learned how to use the iPad to photograph the artwork. Then they added 5-6 words that were inspired by their artwork. The first word they were asked to add was their name.

Here's one of the traditional works -


And here's her work full of words - 

The WordFoto app is customizable so that students can pick different fonts, colors, and other options to make their work as individual as them! They had fun playing around with the settings.

When a student liked their digital work they emailed it to me so that I could add it to their Artsonia Gallery.


The best part of this project was how the students worked on it. I showed the whole class using the iPad hooked up to the projector so they could see how it was done. Then while most of the class worked on another project, 6 students came back to an area of the room to work with the iPads. I helped these students on the steps, answering their questions and showing them some options. When they were finished I showed them how to email the image to me. Then the magic began - these students were asked to go bring another classmate back to the table and they taught that student by using words or pointing (not doing it for them) how to use the app and then how to email it. So by the time everyone's work was done they had been taught how to use the app and then they taught someone else how to use it!


Grant Wood Inspired Landscape Collages


3rd Grade students created these painted paper collage works inspired by Grant Wood. 

The concept of Intermediate colors (Tertiary colors) has been one that my students sometimes have a tough time getting. I would go over the color wheel with them, but we didn't spend much time on it. This year I decided to try something a bit different with my Grant Wood landscape collage project. We spent a couple art classes making painted papers (which students love to do!). I had students pair up so that they could work together. They chose a primary and a secondary color by it to mix into an intermediate color. They mixed the color together on a paper plate and each painted a paper. They used some painting combs or craft sticks to draw some texture into the paint before putting it on the drying rack. The goal was for each pair to mix all six intermediate colors in the two painting classes.


Once we had our papers painted, the students took a look at landscape paintings by Grant Wood. We talked about his use of overlapping and shape. They chose a construction paper for the "sky" color and began to cut and put together their own landscape collage. I encouraged student to split their papers in half (the long way) and trade one of the halves with another student so they would have even more variety for their collage.

The finished projects were awesome!
Check out more of them on Artsonia - Washington Elementary and


See how we took these artworks to a new level using iPads. We added words to our images. See my post "iPad Art - Words and Landscapes"